Showing posts with label pop 'n cuts. Show all posts

Tuesday, August 20, 2013

Halloween Treats

Fall is quickly approaching so I have changed gears a bit and did a Halloween treat to share today.  I have shown a few gift card holders and a tutorial recently that gave me this idea.  As I was making them, I thought that a treat could easily take the place of a gift card.  And that's just what I did!  Take a look at my first Halloween treat of the season.

Are you wondering where the Monster Munchies came from?  This is part of the new DSP called Witches Brew.  One of the designs is a bunch of words and phrases, so I cut out Monster Munchies as it was the perfect size and wording.  I made the gift card holder as I showed you in my recent tutorial.  But instead of a gift card, I added CANDY!

The small packages of M&M's fit just right in the slot!  How cool is that?!  This would be such a cute treat to send to school with your kids or have as favors at a party.  The bottom part of the inside uses the bird from Toil & Trouble and "enjoy" comes from Oh, Goodie.  Let's look at the top next.


The top has more DSP from Witches Brew and another stamp from Toil & Trouble.  This was a quick treat to put together.  I can see this being a pretty easy project to do on a larger scale.

I will definitely be making more of these to share with you this Holiday Season, there are so many ideas floating in my head!  I hope you are inspired too!  Thanks for stopping to check out the fun treat today.  Come back tomorrow for the new Thursday Challenge for Create with Connie and Mary.  I did a fun card using Toil and Trouble to share.


If it doesn't move...stamp it!!
Nicole Tugrul
Independent Stampin' Up! Demonstrator
SHOP 24/7 on my Demonstrator Website
Cards and Retired Stamps for Sale 

Halloween Treats

Fall is quickly approaching so I have changed gears a bit and did a Halloween treat to share today.  I have shown a few gift card holders and a tutorial recently that gave me this idea.  As I was making them, I thought that a treat could easily take the place of a gift card.  And that's just what I did!  Take a look at my first Halloween treat of the season.

Are you wondering where the Monster Munchies came from?  This is part of the new DSP called Witches Brew.  One of the designs is a bunch of words and phrases, so I cut out Monster Munchies as it was the perfect size and wording.  I made the gift card holder as I showed you in my recent tutorial.  But instead of a gift card, I added CANDY!

The small packages of M&M's fit just right in the slot!  How cool is that?!  This would be such a cute treat to send to school with your kids or have as favors at a party.  The bottom part of the inside uses the bird from Toil & Trouble and "enjoy" comes from Oh, Goodie.  Let's look at the top next.


The top has more DSP from Witches Brew and another stamp from Toil & Trouble.  This was a quick treat to put together.  I can see this being a pretty easy project to do on a larger scale.

I will definitely be making more of these to share with you this Holiday Season, there are so many ideas floating in my head!  I hope you are inspired too!  Thanks for stopping to check out the fun treat today.  Come back tomorrow for the new Thursday Challenge for Create with Connie and Mary.  I did a fun card using Toil and Trouble to share.


If it doesn't move...stamp it!!
Nicole Tugrul
Independent Stampin' Up! Demonstrator
SHOP 24/7 on my Demonstrator Website
Cards and Retired Stamps for Sale 

Monday, August 12, 2013

Tutorial: Pop 'n Cut Gift Card Holder

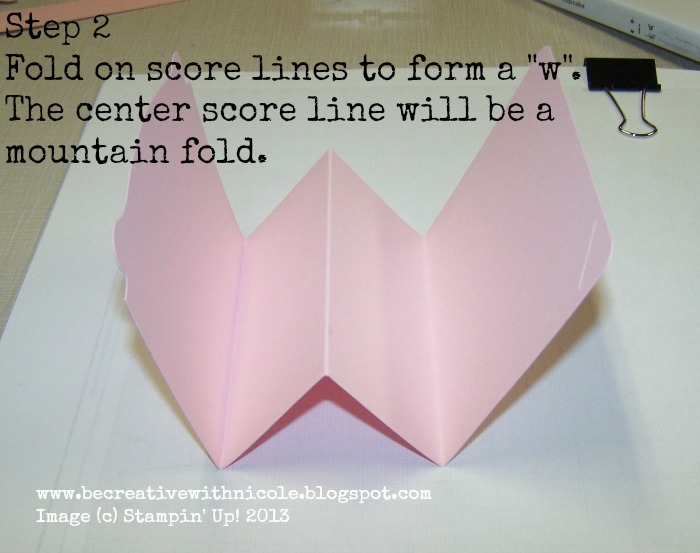
Welcome back!  Today I have a quick tutorial for you.  I got quite a few e-mails with questions about the gift card holder I posted on Flashback Friday, so I thought I'd show you how I made it.  Here is the finished project that I will walk you through.


Pop 'n Cuts Gift Card Holder Tutorial

Supplies:
Pop 'n Cuts Base Die Cut
Score board
Word Window Punch
Sticky Strip 
Sanding block


I hope you get a chance to make this fun gift card holder!  They are very easy to make and lots of fun to embellish.  I have a few more that I will share some time this week.  Thanks for stopping by today!

If it doesn't move...stamp it!!
Nicole Tugrul
Independent Stampin' Up! Demonstrator
SHOP 24/7 on my Demonstrator Website
Cards and Retired Stamps for Sale  
Print Friendly and PDF

Tutorial: Pop 'n Cut Gift Card Holder

Welcome back!  Today I have a quick tutorial for you.  I got quite a few e-mails with questions about the gift card holder I posted on Flashback Friday, so I thought I'd show you how I made it.  Here is the finished project that I will walk you through.


Pop 'n Cuts Gift Card Holder Tutorial

Supplies:
Pop 'n Cuts Base Die Cut
Score board
Word Window Punch
Sticky Strip 
Sanding block


I hope you get a chance to make this fun gift card holder!  They are very easy to make and lots of fun to embellish.  I have a few more that I will share some time this week.  Thanks for stopping by today!

If it doesn't move...stamp it!!
Nicole Tugrul
Independent Stampin' Up! Demonstrator
SHOP 24/7 on my Demonstrator Website
Cards and Retired Stamps for Sale  
Print Friendly and PDF

Sunday, August 11, 2013

Dressed Up Pop Up Card

I have another Pop 'n Cuts card to share today.  This time I used it the traditional way for a Dressed Up card.  I used Blushing Bride and Crumb Cake again, it's such a beautiful combination.

Blooming with Kindness is the stamp set used for this card.  Here's what I did.

1.  Cut Blushing Bride card stock with Pop 'n Cuts base.  Also cut a dress form insert for inside the card, used Blushing Bride card stock for that as well.

2.  Die cut 2 dress forms from Crumb Cake card stock and stamped them both with the flower in Blushing Bride ink.

3.  The front of the card has a large doily that was in my daughter's stash of craft goodies.  I added a die cut from Apothecary Accents Framelits in Whisper White stamped with Blushing Bride flowers.
Added tafetta ribbon and pearls to the dress and adhered it to the Apothecary die cut.

4.  The inside has several layers of paper, let me show you.
The Pop 'n Cuts insert has  a scalloped bottom edge that I added.  I continued with the scallops by adding Crumb Cake borders on the top and bottom.  A retired DSP is added as well.  The dress form is done the same as the front.  I used the birthday greeting from Blooming with Kindness stamped with Soft Suede.

I just love how soft and girlie this card looks!  I have a quick gift card holder tutorial for you.  I got a lot of requests from Friday's post to show how to make it with the Pop 'n Cuts base.  Thanks so much for visiting!


If it doesn't move...stamp it!!
Nicole Tugrul
Independent Stampin' Up! Demonstrator
SHOP 24/7 on my Demonstrator Website
Cards and Retired Stamps for Sale  

Dressed Up Pop Up Card

I have another Pop 'n Cuts card to share today.  This time I used it the traditional way for a Dressed Up card.  I used Blushing Bride and Crumb Cake again, it's such a beautiful combination.

Blooming with Kindness is the stamp set used for this card.  Here's what I did.

1.  Cut Blushing Bride card stock with Pop 'n Cuts base.  Also cut a dress form insert for inside the card, used Blushing Bride card stock for that as well.

2.  Die cut 2 dress forms from Crumb Cake card stock and stamped them both with the flower in Blushing Bride ink.

3.  The front of the card has a large doily that was in my daughter's stash of craft goodies.  I added a die cut from Apothecary Accents Framelits in Whisper White stamped with Blushing Bride flowers.
Added tafetta ribbon and pearls to the dress and adhered it to the Apothecary die cut.

4.  The inside has several layers of paper, let me show you.
The Pop 'n Cuts insert has  a scalloped bottom edge that I added.  I continued with the scallops by adding Crumb Cake borders on the top and bottom.  A retired DSP is added as well.  The dress form is done the same as the front.  I used the birthday greeting from Blooming with Kindness stamped with Soft Suede.

I just love how soft and girlie this card looks!  I have a quick gift card holder tutorial for you.  I got a lot of requests from Friday's post to show how to make it with the Pop 'n Cuts base.  Thanks so much for visiting!


If it doesn't move...stamp it!!
Nicole Tugrul
Independent Stampin' Up! Demonstrator
SHOP 24/7 on my Demonstrator Website
Cards and Retired Stamps for Sale