Showing posts with label Gorgeous Grunge. Show all posts

Sunday, May 1, 2016

Masculine Birthday

Creation Station header

Welcome to the Creation Station Blog Hop for May!  This month we are featuring MASCULINE cards and projects, so be sure to hop all the way around to see all the fabulous ideas!

I created a birthday card for you that combines several items from the Occasions catalog....the SUNBURST THINLIT, NUMBER OF YEARS and PARTY WITH CAKE.

Number of Years becreativewithnicole

The inspiration for this idea came directly from my husband.  It's a running joke that he is 29 and holding.....and he's said that the entire 17 years I've known him!  I can tell you he's definitely not 29, but what's the harm in letting him think he is??

Number of Years

I started out with Basic Gray as my card base and added lots of splotches with GORGEOUS GRUNGE.  I just love how a little grunge can give a more masculine look and feel to a card when using the right colors.  Then I layered on a couple of sunbursts that had been cut down with circle framelits.  I added a little grunge stamping to both then offset them slightly.

Number of Years by becreativewithnicole

The die cut numbers from NUMBER OF YEARS are just too awesome and were the perfect addition to the center of the sunbursts.  I also added a couple of sentiments in the bottom right corner to complete the design.  "Let's Party" from PARTY WITH CAKE was an obvious choice, it coordinated perfectly!  Just another example of how well the different stamp sets can work together!

Number of Years inside of card

After the front was all grunged up, I had to do the same for the inside!  I used PARTY WITH CAKE again for the awesome sentiment and added lots of splotches.  I think Hubby is going to get a kick out of this card for sure!

Now let’s check out what the rest of the FABULOUS Creation Station Design Team has for you.  The next stop is KIMBERLY VAN DIEPEN's awesome blog.   If you’ve just started here, you can also go back to DENITA WRIGHT's wonderful blog to see her project for today.  Be sure to hop all the way around to see all the fabulous Spring inspiration!

Creation station back buttonCreation station next button

1BLOG SIGGY

CLICK HERE to SHOP anytime and earn FREE STAMPS


SHOP the CLEARANCE RACK and WEEKLY DEALS


CLICK HERE to shop TUTORIALS FOR SALE


Subscribe to My Paper Pumpkin


Print Friendly and PDF

Follow my blog with Bloglovin

Wednesday, April 27, 2016

Number of Years

My little guy just turned 3 years old yesterday, so I have a fun post for you today.  I made a couple of birthday cards with NUMBER OF YEARS and show how adding just a few extra details really makes a difference!

Number of Years becreativewithicole

I started out with the simple card shown at the top.  I like the way it turned out, but it could use a little something more.

Number of Years simple becreativewithnicole

I love all the color on the card and the balloons give a fun whimsical feel.  This would be a great design for making a card quickly when you don't have time for more detail.

Number of years stepped up becreativewithnicole

In this second card, you can see a more finished look by adding a couple of extra details.  I added a little extra pop of color by adding a Crushed Curry matting under the designer paper and the white circle.

Number of Years

I also added more color by using GORGEOUS GRUNGE to add a splash of Pool Party ink behind the number 3.  This is actually my favorite detail, it really made a big difference with just a small addition of color.  Lastly, I added color to the balloons.  I stamped the speckles on each balloon which took them to the next level.

Here's my little guy getting ready to blow out the candles,he loved celebrating his birthday. In fact, he loved blowing out the candles so much we re-lit them three times!

Samuel

Number of Years becreativewithicole

What do you think about the versions of this card, do like the stepped up one better too??

1BLOG SIGGY

CLICK HERE to SHOP anytime and earn FREE STAMPS


SHOP the CLEARANCE RACK and WEEKLY DEALS


CLICK HERE to shop TUTORIALS FOR SALE


Subscribe to My Paper Pumpkin


Print Friendly and PDF

Follow my blog with Bloglovin

Friday, May 22, 2015

World's Best Father

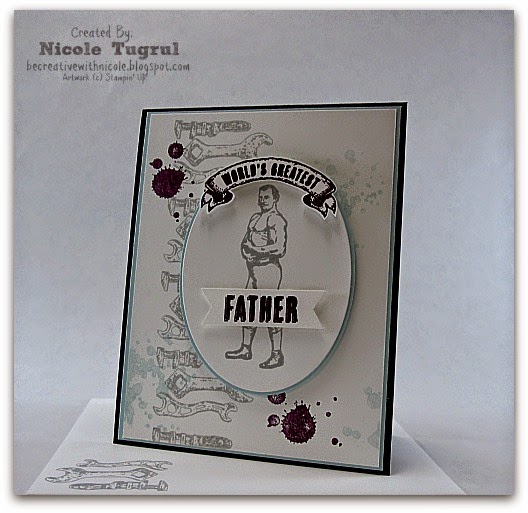
With Father's Day fast approaching, I have been working on cards for the men in my life.  I bet you can guess my go to set for masculine cards..... yep....Guy Greetings!


I was one happy camper when this set showed up in the Occasions Catalog and even happier now that it's going into the new Annual Catalog!  You can do something for every guy in your life, it's really got a little bit of everything!  My hubby is a carpenter by trade so the tools in this set were a no brainer for his card this year.  My inspiration???  Well, Create with Connie and Mary has a great color challenge going so that's where I started.


When the new In Colors were revealed, I started something new to help with color inspiration.  I punched circles for all the color families so I can sit down and put together great new combinations.  I have been taking pictures of the circles next to my cards whether new colors or old to show them off better.  So, here's today's colors with my card.


 I started with the tools first, they make up the background along with a few splotches from Gorgeous Grunge.  I stamped off the Smokey Slate and Blackberry Bliss for a more subtle look.


The muscle guy is stamped with Smokey Slate on an oval and layered on Soft Sky.  I didn't want a big border, so I fussy cut so just a hint of blue was showing.  "World's Greatest" and "Father" are stamped in the bold Blackberry Bliss so it will stand out the most.  Both are popped up with dimensionals to complete the look I was going for.


I am loving how cool and grungy this card turned out and sure my husband will too!!  He'll take any muscle man compliment that he can get!

So, the moral of the story here......get Guy Greetings and make some cool cards for the men in your life too!

That's it for me today, be sure to head back over here tomorrow for the Create with Connie and Mary Saturday Blog Hop!

Happy Stamping!


SHOP anytime and earn FREE STAMPS!


The RETIRING LIST is here! Grab great discounts!!


Print Friendly and PDF

Follow my blog with Bloglovin


World's Best Father

With Father's Day fast approaching, I have been working on cards for the men in my life.  I bet you can guess my go to set for masculine cards..... yep....Guy Greetings!

I was one happy camper when this set showed up in the Occasions Catalog and even happier now that it's going into the new Annual Catalog!  You can do something for every guy in your life, it's really got a little bit of everything!  My hubby is a carpenter by trade so the tools in this set were a no brainer for his card this year.  My inspiration???  Well, Create with Connie and Mary has a great color challenge going so that's where I started.

When the new In Colors were revealed, I started something new to help with color inspiration.  I punched circles for all the color families so I can sit down and put together great new combinations.  I have been taking pictures of the circles next to my cards whether new colors or old to show them off better.  So, here's today's colors with my card.

 I started with the tools first, they make up the background along with a few splotches from Gorgeous Grunge.  I stamped off the Smokey Slate and Blackberry Bliss for a more subtle look.

The muscle guy is stamped with Smokey Slate on an oval and layered on Soft Sky.  I didn't want a big border, so I fussy cut so just a hint of blue was showing.  "World's Greatest" and "Father" are stamped in the bold Blackberry Bliss so it will stand out the most.  Both are popped up with dimensionals to complete the look I was going for.


I am loving how cool and grungy this card turned out and sure my husband will too!!  He'll take any muscle man compliment that he can get!

So, the moral of the story here......get Guy Greetings and make some cool cards for the men in your life too!

That's it for me today, be sure to head back over here tomorrow for the Create with Connie and Mary Saturday Blog Hop!
Happy Stamping!
SHOP anytime and earn FREE STAMPS!
The RETIRING LIST is here! Grab great discounts!!

Print Friendly and PDF

Follow my blog with Bloglovin


Saturday, April 4, 2015

Create with Connie and Mary Blog Hop: An Experiment with Watercolor

Welcome to another Saturday Blog Hop!  This week the team is featuring one of the stamp sets they will be using for Card "Create"tions Celebrations 2015.


http://www.createwithconnieandmary.com/


You should be arriving from Melissa's fabulous blog Rubberfunatics, she has such amazing ideas to share!  If you are just starting here, be sure to hop all the way around so you don't miss a thing!  Now onto my cards for today!  Yes...I said cards, there are FOUR to share!


As you may know if you were here yesterday, I am doing a card set for Card "Create"tions with From the Garden.  I've been playing around with it a bit and today I am sharing what I call my Watercolor Experiment.

Watercolor is something I don't typically do, it's definitely out of my comfort zone.  But, every once in a while I feel the need to pull out my watercolor paper and give it a try.  With there being so many small stamps in From the Garden, I wanted to find a way to be different and make them stand out.   I tried chalkboard paper with white embossing and loved the way it popped on the cards.


Experiment One was a full size card with Marina Mist as the base.  Can you tell what I used to make the splotches on this card??  If you guessed Gorgeous Grunge you are right!  I tried (and failed) to just randomly place bits of color with my aqua painter and hated it!  So, try try again!  Stamping Marina Mist splotches was MUCH better!  I also added flowers and leaves with Rose Red and Pear Pizzaz.  Once all of the stamping was done, I added water with the aqua painter and let it run.  While the paper was drying, I embossed a sentiment with white embossing powder on Chalkboard paper.


I added in a couple of finishing touches and was quite pleased with with results!

OK....let's look at the next experiment, 3"x 3" cards.


As with the first card, this one has an embossed sentiment and a flower added.  But I did something a little bit different for the watercolor.  First step was to add a bit of blue to the paper with a spritzer that has Pool Party and rubbing alcohol.  Next, I grabbed Painted Petals and added flowers and leaves with Rose Red and Pear Pizzaz.  A little spritz of water to let the color run and I had a gorgeous background.


I've done red and blue, so now time for Hello Honey.  Same as before, a spritz of blue then the stamping and a spritz of water.  This sentiment was a little different, I changed it up with a bow and a different shape.  And by the way, did you know where I got these great shapes for the sentiments??  I used the garden picks but cut off the pick part!  That's where the flower and bow come in, they cover up the little area that isn't embossed!!


Last but not least, I switched it up completely and stamped with the flower and leaves in From the Garden then added water for a pretty background.  Then a "hello" die cut adds a whole different look and feel!

So, what do you think??  Was my watercolor experiment a success??

Now, it's time to visit Debbie Henderson's blog Debbie's Designs to see what cool card she's done for us today.

 http://debbiesdesignsblog.blogspot.com/2015/04/create-with-connie-mary-saturday-blog.html


Be sure to hop around and check out all the gorgeous cards from the Design Team!  I hope you'll join us for Card "Create"tions Celebrations 2015 we have so many great ideas to share!!  Today Connie has a FREE tutorial for you so be sure to stop by st see and and don't forget she has BLOG CANDY up for grabs too!


Happy Stamping!!


Print Friendly and PDF

Follow my blog with Bloglovin


Create with Connie and Mary Blog Hop: An Experiment with Watercolor

Welcome to another Saturday Blog Hop!  This week the team is featuring one of the stamp sets they will be using for Card "Create"tions Celebrations 2015.

http://www.createwithconnieandmary.com/

You should be arriving from Melissa's fabulous blog Rubberfunatics, she has such amazing ideas to share!  If you are just starting here, be sure to hop all the way around so you don't miss a thing!  Now onto my cards for today!  Yes...I said cards, there are FOUR to share!


As you may know if you were here yesterday, I am doing a card set for Card "Create"tions with From the Garden.  I've been playing around with it a bit and today I am sharing what I call my Watercolor Experiment.

Watercolor is something I don't typically do, it's definitely out of my comfort zone.  But, every once in a while I feel the need to pull out my watercolor paper and give it a try.  With there being so many small stamps in From the Garden, I wanted to find a way to be different and make them stand out.   I tried chalkboard paper with white embossing and loved the way it popped on the cards.

Experiment One was a full size card with Marina Mist as the base.  Can you tell what I used to make the splotches on this card??  If you guessed Gorgeous Grunge you are right!  I tried (and failed) to just randomly place bits of color with my aqua painter and hated it!  So, try try again!  Stamping Marina Mist splotches was MUCH better!  I also added flowers and leaves with Rose Red and Pear Pizzaz.  Once all of the stamping was done, I added water with the aqua painter and let it run.  While the paper was drying, I embossed a sentiment with white embossing powder on Chalkboard paper.

I added in a couple of finishing touches and was quite pleased with with results!

OK....let's look at the next experiment, 3"x 3" cards.

As with the first card, this one has an embossed sentiment and a flower added.  But I did something a little bit different for the watercolor.  First step was to add a bit of blue to the paper with a spritzer that has Pool Party and rubbing alcohol.  Next, I grabbed Painted Petals and added flowers and leaves with Rose Red and Pear Pizzaz.  A little spritz of water to let the color run and I had a gorgeous background.

I've done red and blue, so now time for Hello Honey.  Same as before, a spritz of blue then the stamping and a spritz of water.  This sentiment was a little different, I changed it up with a bow and a different shape.  And by the way, did you know where I got these great shapes for the sentiments??  I used the garden picks but cut off the pick part!  That's where the flower and bow come in, they cover up the little area that isn't embossed!!

Last but not least, I switched it up completely and stamped with the flower and leaves in From the Garden then added water for a pretty background.  Then a "hello" die cut adds a whole different look and feel!

So, what do you think??  Was my watercolor experiment a success??

Now, it's time to visit Debbie Henderson's blog Debbie's Designs to see what cool card she's done for us today.
 http://debbiesdesignsblog.blogspot.com/2015/04/create-with-connie-mary-saturday-blog.html

Be sure to hop around and check out all the gorgeous cards from the Design Team!  I hope you'll join us for Card "Create"tions Celebrations 2015 we have so many great ideas to share!!  Today Connie has a FREE tutorial for you so be sure to stop by st see and and don't forget she has BLOG CANDY up for grabs too!

Happy Stamping!!


Print Friendly and PDF

Follow my blog with Bloglovin