Showing posts with label floral. Show all posts

Sunday, April 3, 2016

Spring Flowers

Creation Station header

Welcome to the April Creation Station Blog Hop!  Now that spring is officially here, we thought you'd love to see ideas featuring SPRING FLOWERS and the BOTANICAL BLOOMS BUNDLE.  Since I've been all about the March My Paper Pumpkin lately, I made a fun project for you featuring it and the BOTANICAL BUILDERS FRAMELITS.

Paper Pumpkin tag box and card becreativewithnicole.com

Yesterday, I used the same collection of colors that coordinate beautifully with the March My Paper Pumpkin.  I carried that theme over to today and made a card and set of tags that would make a perfect hostess gift!

Botanical Builder becreativewithnicole.com

First let's talk about the box of tags.  I came up with 6 tags for you but I didn't want to just show you the tags, I wanted a box to give them in.  The first thing that came to mind was to the oh so easy TAG A BAG GIFT BOXES!  These boxes are super easy to put together and make a fabulous gift with little effort!  I simply created a belly band to decorate the clear sleeve (I used a part of the MPP kit!) and added a flower. What could be simpler!

Tags My Paper Pumpkin becreativewithnicole.com

Now, let's talk TAGS!  These little guys came together in a flash!  I sat down with the MPP kit and a few punches and they practically made themselves!  I used different bits and pieces of the kit to give variety.  The SCALLOPED TAG TOPPER PUNCH came in handy as well as the BANNER TRIPLE PUNCH.  And of course, we can't forget about the BOTANICAL BUILDER FRAMELITS!  Here's a quick tip for saving time, get the colors of cardstock that you are focusing on and go ahead and die cut a bunch of flowers all at once.  When you are creating this gives you the opportunity to try out different color combinations and looks.  Anything that is left over can be easily used on another card or project!

Tags becreativewithnicole.com

I also used the 1 1/4" CIRCLE PUNCH for sentiments.  You may notice that I used the My Paper Pumpkin stamp set for all the tags.  The simple greetings make great tags!

Tags2 becreativewithnicole.com

I also added in the gorgeous POOL PARTY GLITTER RIBBON.  It was a great finishing touch for my tags!

Tags3 becreativewithnicole.com

I also added in the green pearls from the MPP kit and WHITE PERFECT ACCENTS for the center of my flowers.

Paper Pumpkin tag box and card becreativewithnicole.com

Every gift needs a card, so I created a card with the CUPS & KETTLE FRAMELITS and more bits and pieces of the My Paper Pumpkin kit.  The card coordinates beautifully since I used the floral paper on the card to tie it all together.

Let me ask you something….are you a Paper Pumpkin subscriber yet??  If you are then woo hoo for you!  If not, what are you waiting for??

PP_Free-Gift_Slider-Image

Stampin’ Up! is celebrating the 3 year birthday of Paper Pumpkin by giving an extra, yes I said EXTRA stamp set in the April Kit!  Now is the time to take action if you haven’t tried these awesome kits yet!  The March kit is just amazing, I am just getting started with it and will have lots of alternative ideas to share.

2

I hope you’ll give My Paper Pumpkin a try and enjoy the extra FREE STAMPS!  Just click on the picture below to visit the My Paper Pumpkin site and join in the fun!  To take advantage of this special deal, you must sign up by April 10th…so don’t wait!

My Paper PumpkinNow let's check out what the rest of the FABULOUS Creation Station Design Team has for you.  The next stop is SARA and if you've just started here, you can also go back to DENITA to see her project for today.  Be sure to hop all the way around to see all the fabulous Spring inspiration!

Creation station back buttonCreation station next button

1BLOG SIGGY

CLICK HERE to SHOP anytime and earn FREE STAMPS


SHOP the CLEARANCE RACK and WEEKLY DEALS


CLICK HERE to shop TUTORIALS FOR SALE


Subscribe to My Paper Pumpkin


Print Friendly and PDF

Follow my blog with Bloglovin

Friday, March 25, 2016

Hello Spring

Welcome to another Create with Connie and Mary Saturday Blog Hop!  This week our theme is HELLO SPRING so we are featuring FLORAL projects!

SpringBlogHopBadge

I have been all about cards lately.  So to switch things up a little, I made a BAKER'S BOX for you today!

Celebrate Spring Baker's Box becreativewithnicole

Doesn't this just scream spring!!  I almost made a Mini Treat Bag, but I thought the BAKER'S BOX was perfect for a grown up Easter gift that I need for Sunday.

Baker's Box becreativewithnicole

I wanted light and happy spring colors, so BIRTHDAY BOUQUET DSP was used for the box.  To keep the sentiment bold, I went with the EXPRESSIONS NATURAL ELEMENTS.  The "celebrate" element hangs over the sides a little, but I like how that looks!

flower

I kept the flower monochromatic with a layering of Blushing Bride BOTANICAL BUILDER flowers.  I added several leaves as well in different colors to make the flower larger and bolder.

Check the supply list below so you can make your own BOTANICAL BLOOMS BAKER'S BOX!!

SUPPLIES:

DIE CUTS:  Baker's Box Thinlits, Botanical Builder Framelits

PAPER: Birthday Bouquet DSP, Blushing Bride, Pear Pizzaz, Mossy Meadow


ACCESSORIES: Big Shot, Stampin’ Trimmer, Tear Tape, bone folder, dimensionals, Expressions Natural Elements, Mini Clothes Pin, White Perfect Accents, Tombo All-Purpose Adhesive


Next, let’s check out what the rest of the Design Team has for us today. Click Previous to visit the very talented Mary Brown and Next to see the very talented Debbie Henderson.


Thanks for hopping with us, we love inspiring you!  Happy Stamping!


Print Friendly and PDF

Follow my blog with Bloglovin

Tuesday, November 3, 2015

Last MPP Cards

I have the last two cards to share made with the October My Paper Pumpkin kit.  I've had SO MUCH FUN with this kit and can't wait to see what November's looks like!  The first card is a thank you card that features the EXPRESSIONS NATURAL ELEMENTS.

Thanks Oct MPP becreativewithnicole.com

I love these natural element embellishments, they add great dimension to cards and projects.  I used mostly the kit for this card, keeping the stamping in the background on the neutral side.

The second card is yet another anniversary card, less floral and more woodsy.

MPP becreativewithnicole.com

I am really loving Mossy Meadow right now, it worked beautifully with the dijon banner.  I used a retired sentiment again, but I love how it fit neatly in the banner and the script is pretty!

So that's it for the October kit from me this month.  I am SUPER looking forward to November's kit to see what we get!  To see the past cards made with the October kit, just click on the links below.

October Kit Card One


October Kit Card Two


October Kit Cards Three and Four


1BLOG SIGGY


CLICK HERE to SHOP anytime and earn FREE STAMPS


SHOP the CLEARANCE RACK and WEEKLY DEALS


CLICK HERE to shop TUTORIALS FOR SALE


Subscribe to My Paper Pumpkin


Print Friendly and PDF

Follow my blog with Bloglovin

Monday, February 23, 2015

Love is Kindness for TSSC355

Happy Monday!  I have a card to share today for the Monday Lunchtime Sketch Challenge.  Mary Jo has a great sketch for us as usual.  I hope you will join the challenge with us!  Also, please stop by to say Happy Birthday to Mary Jo, she turned 50 today!


I pondered this one a little, I didn't know if I wanted to do the same tag shape or something a little different.  I ended up using something different so I could use the really beautiful stamp Love is Kindness.


At first glance through the catalog I didn't really pay much attention to this stamp.  BUT....I started seeing all of the gorgeous cards that were being made so of course I had to get it!   I can now say if you don't have it, GET IT!  I had such a great time designing and coloring this card.  The image is perfect for the blendabilities and is full proof...you can't mess it up!


Here's the scoop on the design:

-Coastal Cabana card base, Gorgeous Grunge speckles  stamped all over in Coastal Cabana
-Strip of Typeset DSP along the left side
-Strip of Blushing Bride along the center, embossed with Happy Heart EF
-Strip of striped design washi tape from Stacked with Love Washi, added along bottom edge of Blushing Bride cardstock
 -Floral mage stamped on Very Vanilla cut from Apothecary Accents Framelit
-Image colored with blendabilities: Pink Pirouette, Wild Wasabi plus Soft Sky for outline
-Sentiment from Crazy About You added with a dimensional
-A few Bermuda Bay sequins scattered around

Once I knew where I was going with this one, it went really quick.  The coloring was fast since the image isn't too big.  One tip for you, I separated the sentiment from the flowers when I was putting my stamp together.  I simply put the sentiment on a small wood block of it's own.  It makes the stamp more versatile, I can use it without the sentiment very easily or add it in if I want.

OK....your turn now!  Just go to Techno Stamper for all the details plus more great samples from the Design Team.


Mary Jo Price- Williams:  Technostamper 


Sue Root:  Stampin' With Sue2


Robbie Rubula: InkedX2 


Tanya Bell: Stamping T! 


Carolyn Bennett: Carolyn's Paper Fantasies 


Jonia Smith: Stampin for Me 

Mary Brown: Stamper Camper


Thanks for stopping by!  Happy Stamping!


Print Friendly and PDF

Follow my blog with Bloglovin


Love is Kindness for TSSC355

Happy Monday!  I have a card to share today for the Monday Lunchtime Sketch Challenge.  Mary Jo has a great sketch for us as usual.  I hope you will join the challenge with us!  Also, please stop by to say Happy Birthday to Mary Jo, she turned 50 today!


I pondered this one a little, I didn't know if I wanted to do the same tag shape or something a little different.  I ended up using something different so I could use the really beautiful stamp Love is Kindness.

At first glance through the catalog I didn't really pay much attention to this stamp.  BUT....I started seeing all of the gorgeous cards that were being made so of course I had to get it!   I can now say if you don't have it, GET IT!  I had such a great time designing and coloring this card.  The image is perfect for the blendabilities and is full proof...you can't mess it up!

Here's the scoop on the design:

-Coastal Cabana card base, Gorgeous Grunge speckles  stamped all over in Coastal Cabana
-Strip of Typeset DSP along the left side
-Strip of Blushing Bride along the center, embossed with Happy Heart EF
-Strip of striped design washi tape from Stacked with Love Washi, added along bottom edge of Blushing Bride cardstock
 -Floral mage stamped on Very Vanilla cut from Apothecary Accents Framelit
-Image colored with blendabilities: Pink Pirouette, Wild Wasabi plus Soft Sky for outline
-Sentiment from Crazy About You added with a dimensional
-A few Bermuda Bay sequins scattered around

Once I knew where I was going with this one, it went really quick.  The coloring was fast since the image isn't too big.  One tip for you, I separated the sentiment from the flowers when I was putting my stamp together.  I simply put the sentiment on a small wood block of it's own.  It makes the stamp more versatile, I can use it without the sentiment very easily or add it in if I want.

OK....your turn now!  Just go to Techno Stamper for all the details plus more great samples from the Design Team.

Mary Jo Price- Williams:  Technostamper 
Sue Root:  Stampin' With Sue2
Robbie Rubula: InkedX2 
Eileen LeFevre: Eileen's Stampin' Fever Blog 
Tanya Bell: Stamping T! 
Carolyn Bennett: Carolyn's Paper Fantasies 
Jonia Smith: Stampin for Me 
Mary Brown: Stamper Camper

Thanks for stopping by!  Happy Stamping!

Print Friendly and PDF

Follow my blog with Bloglovin


Friday, February 13, 2015

Bouquet Bigz L Die

It's Friday, which means my last exclusive tutorial for the Spring Collection 2015 has gone live.  The four weeks have flown by and I have loved every minute!  If you aren't a subscriber yet, you can still join in the fun!  Just go to Create with Connie and Mary for all the details.


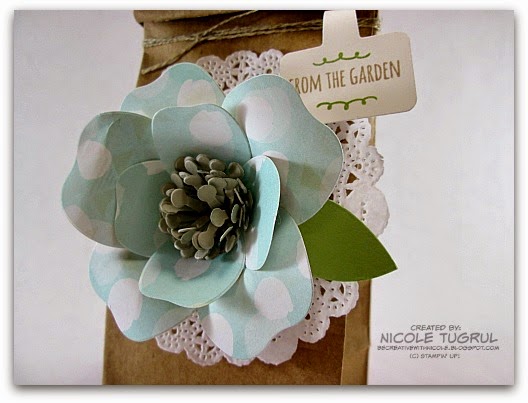
My exclusive project features the new Bouquet Bigz L Die so I wanted to do a little project for you today to show how pretty these flowers are! 


I put together a quick package using a Petite Cafe' Bag.  This is a great way to give a little gift in style!  The embellishment is simple. Just a gorgeous flower, a doily and a little tag with linen thread.


The flower consists of three parts from the die.  A layer of 5 large petals, a layer of 4 small petals and a grouping of 5 stamens in the center.  The paper for the petals is the soft polka dot design from the  Best Year Ever Designer Series Paper.  The stamens are in Sahara Sand.  I like the soft color for the center, these colors blend beautifully.


I layered the flower on a doily to soften up the background.  A couple of leaves die cut in Pear Pizzaz are glued on each side of the flower.  I used hot glue for this project to assure a firm hold.

The linen thread is wrapped around the top of the bag a few times and tied with a simple knot.  The finishing touch is a sweet little tag made with a garden pick made with From the Garden stamps and coordinating framelits.  I made it crisp and clean on Whisper White cardstock with Crumb Cake and Pear Pizzaz ink.  The tag is hooked over the thread and the end sealed to the back with a mini glue dot.


I think this would make a lovely gift for Mother's Day or Easter, it's just screams Spring and happiness!

I hope you give this great Bouquet Bigz L die a try, it has so many possibilities!  Be sure to check back tomorrow, I will have a card to share that uses this die and the matching stamp set.


Thanks for visiting!  Happy Stamping!


Print Friendly and PDF

Follow my blog with Bloglovin


Built for Free Using: My Stampin Blog


Bouquet Bigz L Die

It's Friday, which means my last exclusive tutorial for the Spring Collection 2015 has gone live.  The four weeks have flown by and I have loved every minute!  If you aren't a subscriber yet, you can still join in the fun!  Just go to Create with Connie and Mary for all the details.

 
My exclusive project features the new Bouquet Bigz L Die so I wanted to do a little project for you today to show how pretty these flowers are! 

I put together a quick package using a Petite Cafe' Bag.  This is a great way to give a little gift in style!  The embellishment is simple. Just a gorgeous flower, a doily and a little tag with linen thread.

The flower consists of three parts from the die.  A layer of 5 large petals, a layer of 4 small petals and a grouping of 5 stamens in the center.  The paper for the petals is the soft polka dot design from the  Best Year Ever Designer Series Paper.  The stamens are in Sahara Sand.  I like the soft color for the center, these colors blend beautifully.

I layered the flower on a doily to soften up the background.  A couple of leaves die cut in Pear Pizzaz are glued on each side of the flower.  I used hot glue for this project to assure a firm hold.

The linen thread is wrapped around the top of the bag a few times and tied with a simple knot.  The finishing touch is a sweet little tag made with a garden pick made with From the Garden stamps and coordinating framelits.  I made it crisp and clean on Whisper White cardstock with Crumb Cake and Pear Pizzaz ink.  The tag is hooked over the thread and the end sealed to the back with a mini glue dot.

I think this would make a lovely gift for Mother's Day or Easter, it's just screams Spring and happiness!

I hope you give this great Bouquet Bigz L die a try, it has so many possibilities!  Be sure to check back tomorrow, I will have a card to share that uses this die and the matching stamp set.

Thanks for visiting!  Happy Stamping!


Print Friendly and PDF

Follow my blog with Bloglovin


Built for Free Using: My Stampin Blog